Cakes 'n More by Valerie

Saturday, June 18, 2005

Around the strawberry patch

I love strawberries, and I love making cakes too. So what better way to celebrate these two loves than to mesh them together in one fantastic creation? Ladies and gentlemen... I give you the strawberry cream cake.


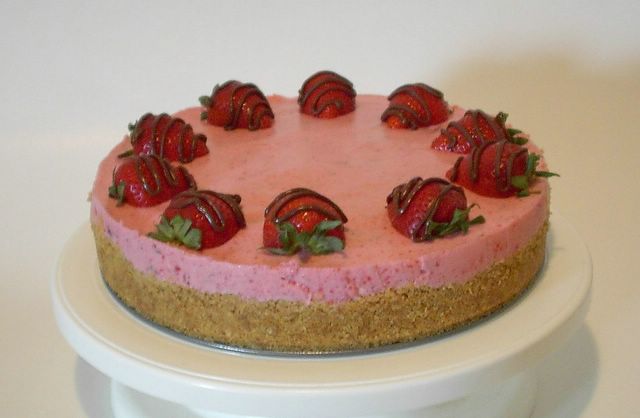
I got this recipe from my seasonally issued subscription to Kraft's What's Cooking magazine. I have to say I was especially impressed with the assortment of recipes this issue. Everything from tasty chicken treats to vegetarian dips. This is one of the very rare times when I followed the recipe to the letter and thus will just link you to Kraft's site instead of posting the recipe here.

I can't wait until Craig gets home so we can try it out. Posted by Hello

Friday, June 17, 2005

There is no better treat to have on a hot day than a lovely bowl of ice cream to cool you down. This week I had the opportunity to try out Wilton's new ice cream maker, it's one of the perks of being a Wilton instructor.

I found the machine incredibly easy to use and because of it's new freezing technology you only need to buy the ingredients for the ice cream itself instead of the usual rock salt and ice that you need to get and make. Basically all you do is cook up your favourite base for ice cream, in this case I used a recipe for making chocolate ice cream consisting of milk, whipping cream, eggs, sugar and cocoa powder.

Last night I started off by cooking the eggs, milk and sugar on the stove until it thickened, after which I added the cocoa powder and whipping cream. I then put the whole thing into the fridge to chill overnight. At this point I already had the ice cream base in the freezer getting ready for making ice cream the next morning.

Basically the way the machine works is that the base bowl of the machine is lined with gel pack material of some sort. Similar to the stuff that goes into those gel packs that your mom used to put into your lunches to keep everything nice and cold. After the bowl is frozen it goes into a second bowl which allows it to basically float off the table with only the rim touching the outer bowl, this creates an environment that reduces the amount of cold material touching an given surface, thus keeping it colder for longer than had the bowl been sitting directly on the table.


So the very next morning eager to start my experiments with the Wilton ice cream machine I started to assemble the machine. I took the now frozen base bowl out of the freezer and placed it into the plastic presentation bowl where it hung nicely above the table. I poured the chocolate ice cream mixture I had made the previous night into the bowl and was surprised that all of it fit into the frozen bowl perfectly. I placed the dasher into the bowl and set the lid on with the churn handle. At first the churning was a bit difficult and I was concerned that the machine would not be able to handle the stress but it soon loosened up. I turned the crank 6 times as was indicated in the instructions, then waited a minute, turned the crank again 6 times and then waited 2 minutes. Every 2 minutes after that I churned the crank exactly 6 times for the next 30 minutes, this was quite easy to do with the timer on my watch.

Everytime I churned I watched through the clear plastic lid to see if anything was happening, I tend to be a bit impatient when it comes to making ice cream. But sure enough, after about 20 minutes of churning and waiting I noticed a considerable lump of hardened soft serve ice cream collecting around the middle of the dasher.

After 30 minutes I removed the lid and dasher, at this point I could have eaten the ice cream as soft serve, but I put the bowl into the freezer to have firmer ice cream.

At this point I would say that the Wilton ice cream maker experiment was a success. I only wish that I could keep the machine it was so much fun to use. Posted by Hello

Friday, June 03, 2005

Everyone get excited! It's puffy pizza!

A few years ago there was this product that was a pizza made with a puff pastry crust out on the market that was supposed to be all the rage but has since disappeared from the shelves. Today I revive that recipe in a personal sized version.


Puff Pastry Pizza
Idea from President's Choice Puffy Pizza

1 box puff pastry, thawed and rolled out into a 10"x10" square
1 1/2 cups mozzerella cheese, shredded
1 1/2 cups pizza sauce (if you want to make your own, see recipe below)
various pizza toppings (as many different kinds as you like)

Preheat oven to 375F.

Cut puff pastry into 4 squares, each 5" x 5" in dimension.

Score a half inch border around the inside of each square using a knife, then make a criss cross design on the border.

Place each pizza onto a baking sheet lined with parchment paper.

Cover the inside area of each pastry square with pizza sauce taking care not to get any on the criss-cross border.


Chop your pizza toppings into tiny pieces, no bigger than a half inch square and mix it up in a bowl with the shredded cheese. Sprinkle the pizza toppings onto the pizza sauce section of the puff pastry and taking care to keep the toppings off the criss-cross area.


Place the baking sheet into the oven and bake for 30 - 35 minutes or until the crust is golden brown.


The crust is a nice light, flaky and buttery alternative to the regular doughy or crispy type crusts you normally get from pizza. It's sure to be a crowd pleaser the next time you have friends over for dinner. Posted by Hello

Wednesday, June 01, 2005

Turning over a new mushroom

I think that puff pastry is one of those things that when eaten you just have to say, "Ok, it's going to be messy but worth it in the end". The light buttery flakiness that melts the minute it touches your tounge mixed with the scrumptious filling made to tantalize your taste buds.


And thus is how I came to the decision that it was again that time of year where I would make some Mushroom Turnovers out of one of my favourite cookbooks.

The filling consists of a rice and sautéed mushroom filling to which I usually like to add a splash of lemon juice for a little bit extra zip.

Mushroom Turnovers
Adapted from Help! My Apartment has a Dining Room

I love the puff pastries they have on the market today, you don't even need to roll it out anymore, simply defrost and use. Of course if you're the adventurous type you can venture into making your own puff pastry from scratch.


1 450g package of frozen puff pastry sheets
1 cup cooked rice (or 1/2 cup uncooked rice)
5 scallions (or green onions)
6 - 7 medium or large mushrooms
1 tbsp butter or margarine
1/2 cup sour cream
4 tsp dried dill
1/2 tsp salt
1/4 tsp black pepper

Thaw the puff pastry sheets according to the package directions.

While waiting for the puff pastry sheets to thaw chop the mushrooms into large chunky pieces, and chop the scallions. Add the butter or margarine to a medium size pan, add the mushrooms and green onions; sautée until everything is soft but not browned.

Preheat the oven to 400F.

Pour the contents of the pan into a large bowl and add the cooked rice. Mix.

Add the sour cream, dried dill, salt and pepper to the mixture and combine well.

Unfold the puff pastry, if you're lucky like me and bought the pre-rolled kind you can just go on from here. Otherwise roll the each puff pastry into a square about 12" x 12".

Cut each rolled puff pastry a set of 4 squares.

Spoon 1 - 2 tablespoons of the mushroom mixture into the centre of each square and fold diagonally so that it forms a triangle shape. Be sure to pinch the edges down so that none of the filling comes out.

Bake for 30 - 35 mins or until golden brown. Posted by Hello