Cakes 'n More by Valerie

Wednesday, February 08, 2006

The Bottom of the Bag

It's nacho time again, and especially with the Super Bowl that has just passed you probably had a few leftovers, including those poor little nacho chips in the bottom of the bag that got so crushed that they're too little to dip. So what do you do? Throw them away? Nay I say! Save them!

These little nacho chips (or even plain potato chips) can be crushed further and used as bread crumbs; it'll add that extra crispiness and flavour to your dishes.

I usually put them away in a Ziploc bag so they don't go stale until I've saved up enough (usually what's left of the bottom of 2 nacho chip bags works).

Note: Since nacho chips are usually salted, if the breading recipe calls for salt to be added I just leave it out.

Sunday, October 23, 2005

Tiny Teddy's Invade!

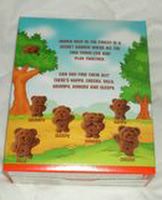
I was watching TV the other night with a bunch of people when I came across the cutest little commercial ever! It was an ad for Tiny Teddy's which are little teddy bear shaped cookies; same idea as Teddy Grahams.

Basically the little teddy's are going on a mission to a foreign planet and discover that the new planet is covered in vanilla cream! They proceed to get all excited, tell mission command and have a food fight with the vanilla cream! I just can't help myself when it comes to cute stuff like that.

After the commercial, I asked if they were made of graham crackers and no one knew what they were. I'll have to do some further research as to what exactly Australians use to make cheesecake crusts. I'm willing to bet that they just call it something different seeing as I know they sell cheesecake here.

Upon first glance at the box it's your standard idea of what you'd expect for such a product.


Unlike Teddy Grahams, Tiny Teddy's come in 6 different poses instead of 2. There's grumpy, silly, sleepy, hungry, cheeky and happy; they almost sound like Care Bears don't they?


Well... I don't think they taste as good as the real Teddy Grahams. They're basically chocolate cookies but nothing special other than that. I have to say that I'm quite disappointed with these Tiny Teddy's. Arnott's... makers of the fantastically delicious TimTams, I'm disappointed with your Teddy's. :( Posted by Picasa

Friday, July 01, 2005

Happy Canada Day!

Happy Canada day everybody! For those of you who don't know, it is very rare to find desserts that are tailored to this specific holiday. I'm not exactly sure why, perhaps it's the daunting task of creating an edible version of our national symbol the maple leaf or creating those deep tones of beautiful red that is in our flag.

I seem to recall an ice cream company that wanted to create a seasonal ice cream in the traditional rectangular cardboardish box, that when opened would show the Canadian flag. The idea was to "pipe" the icecream in as they do with many other shapes of ice cream. This proved to be far more difficult than was originally expected since when ice cream is initially packaged it is still in it's "soft serve" state. Thus, the red ice cream maple leaf melded to the white ice cream that surrounded it creating a half-way look between Canada and Japan's flag.

Well... last year, Kraft came out with a most fantastic Canada Day cake, and I tell you this cake has everything in it! There's wonderfully red strawberries that make a beautiful maple leaf shape sitting on top of Cool Whip (who doesn't love Cool Whip?), and a Jell-O middle (there's always room for Jell-O) and of course the cake, pound cake that is. I'm sure it'll be a hit at any gathering, and if you're not Canadian, or the maple leaf isn't your thing you can always alter the pattern on the top of the cake to look like something else, a heart perhaps?

Saturday, June 18, 2005

Around the strawberry patch

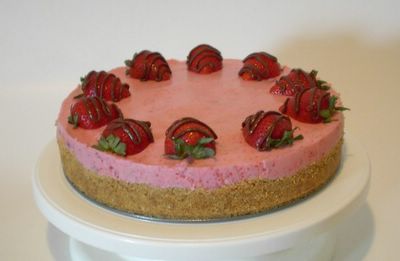
I love strawberries, and I love making cakes too. So what better way to celebrate these two loves than to mesh them together in one fantastic creation? Ladies and gentlemen... I give you the strawberry cream cake.


I got this recipe from my seasonally issued subscription to Kraft's What's Cooking magazine. I have to say I was especially impressed with the assortment of recipes this issue. Everything from tasty chicken treats to vegetarian dips. This is one of the very rare times when I followed the recipe to the letter and thus will just link you to Kraft's site instead of posting the recipe here.

I can't wait until Craig gets home so we can try it out. Posted by Hello

Friday, June 17, 2005

There is no better treat to have on a hot day than a lovely bowl of ice cream to cool you down. This week I had the opportunity to try out Wilton's new ice cream maker, it's one of the perks of being a Wilton instructor.

I found the machine incredibly easy to use and because of it's new freezing technology you only need to buy the ingredients for the ice cream itself instead of the usual rock salt and ice that you need to get and make. Basically all you do is cook up your favourite base for ice cream, in this case I used a recipe for making chocolate ice cream consisting of milk, whipping cream, eggs, sugar and cocoa powder.

Last night I started off by cooking the eggs, milk and sugar on the stove until it thickened, after which I added the cocoa powder and whipping cream. I then put the whole thing into the fridge to chill overnight. At this point I already had the ice cream base in the freezer getting ready for making ice cream the next morning.

Basically the way the machine works is that the base bowl of the machine is lined with gel pack material of some sort. Similar to the stuff that goes into those gel packs that your mom used to put into your lunches to keep everything nice and cold. After the bowl is frozen it goes into a second bowl which allows it to basically float off the table with only the rim touching the outer bowl, this creates an environment that reduces the amount of cold material touching an given surface, thus keeping it colder for longer than had the bowl been sitting directly on the table.


So the very next morning eager to start my experiments with the Wilton ice cream machine I started to assemble the machine. I took the now frozen base bowl out of the freezer and placed it into the plastic presentation bowl where it hung nicely above the table. I poured the chocolate ice cream mixture I had made the previous night into the bowl and was surprised that all of it fit into the frozen bowl perfectly. I placed the dasher into the bowl and set the lid on with the churn handle. At first the churning was a bit difficult and I was concerned that the machine would not be able to handle the stress but it soon loosened up. I turned the crank 6 times as was indicated in the instructions, then waited a minute, turned the crank again 6 times and then waited 2 minutes. Every 2 minutes after that I churned the crank exactly 6 times for the next 30 minutes, this was quite easy to do with the timer on my watch.

Everytime I churned I watched through the clear plastic lid to see if anything was happening, I tend to be a bit impatient when it comes to making ice cream. But sure enough, after about 20 minutes of churning and waiting I noticed a considerable lump of hardened soft serve ice cream collecting around the middle of the dasher.

After 30 minutes I removed the lid and dasher, at this point I could have eaten the ice cream as soft serve, but I put the bowl into the freezer to have firmer ice cream.

At this point I would say that the Wilton ice cream maker experiment was a success. I only wish that I could keep the machine it was so much fun to use. Posted by Hello

Friday, June 03, 2005

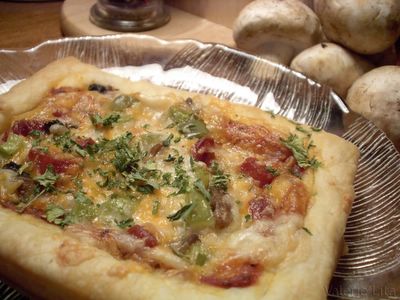
Everyone get excited! It's puffy pizza!

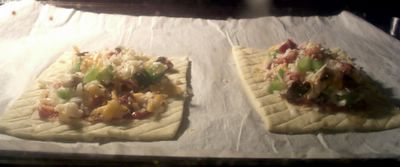
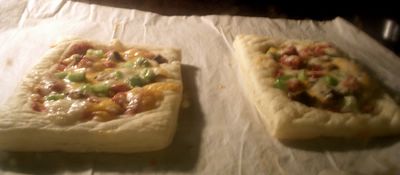
A few years ago there was this product that was a pizza made with a puff pastry crust out on the market that was supposed to be all the rage but has since disappeared from the shelves. Today I revive that recipe in a personal sized version.


Puff Pastry Pizza
Idea from President's Choice Puffy Pizza

1 box puff pastry, thawed and rolled out into a 10"x10" square
1 1/2 cups mozzerella cheese, shredded
1 1/2 cups pizza sauce (if you want to make your own, see recipe below)
various pizza toppings (as many different kinds as you like)

Preheat oven to 375F.

Cut puff pastry into 4 squares, each 5" x 5" in dimension.

Score a half inch border around the inside of each square using a knife, then make a criss cross design on the border.

Place each pizza onto a baking sheet lined with parchment paper.

Cover the inside area of each pastry square with pizza sauce taking care not to get any on the criss-cross border.


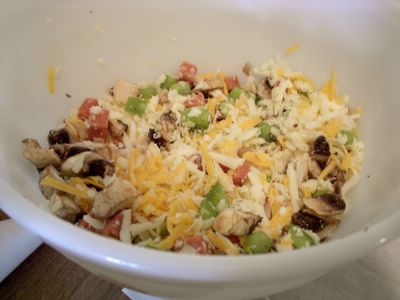
Chop your pizza toppings into tiny pieces, no bigger than a half inch square and mix it up in a bowl with the shredded cheese. Sprinkle the pizza toppings onto the pizza sauce section of the puff pastry and taking care to keep the toppings off the criss-cross area.


Place the baking sheet into the oven and bake for 30 - 35 minutes or until the crust is golden brown.


The crust is a nice light, flaky and buttery alternative to the regular doughy or crispy type crusts you normally get from pizza. It's sure to be a crowd pleaser the next time you have friends over for dinner. Posted by Hello

Wednesday, June 01, 2005

Turning over a new mushroom

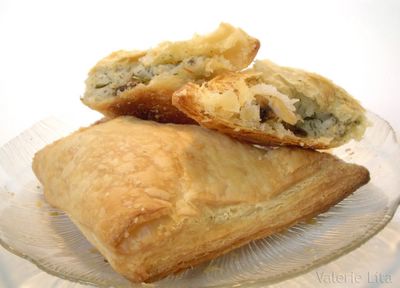
I think that puff pastry is one of those things that when eaten you just have to say, "Ok, it's going to be messy but worth it in the end". The light buttery flakiness that melts the minute it touches your tounge mixed with the scrumptious filling made to tantalize your taste buds.


And thus is how I came to the decision that it was again that time of year where I would make some Mushroom Turnovers out of one of my favourite cookbooks.

The filling consists of a rice and sautéed mushroom filling to which I usually like to add a splash of lemon juice for a little bit extra zip.

Mushroom Turnovers
Adapted from Help! My Apartment has a Dining Room

I love the puff pastries they have on the market today, you don't even need to roll it out anymore, simply defrost and use. Of course if you're the adventurous type you can venture into making your own puff pastry from scratch.

1 450g package of frozen puff pastry sheets
1 cup cooked rice (or 1/2 cup uncooked rice)
5 scallions (or green onions)
6 - 7 medium or large mushrooms
1 tbsp butter or margarine
1/2 cup sour cream
4 tsp dried dill
1/2 tsp salt
1/4 tsp black pepper

Thaw the puff pastry sheets according to the package directions.

While waiting for the puff pastry sheets to thaw chop the mushrooms into large chunky pieces, and chop the scallions. Add the butter or margarine to a medium size pan, add the mushrooms and green onions; sautée until everything is soft but not browned.

Preheat the oven to 400F.

Pour the contents of the pan into a large bowl and add the cooked rice. Mix.

Add the sour cream, dried dill, salt and pepper to the mixture and combine well.

Unfold the puff pastry, if you're lucky like me and bought the pre-rolled kind you can just go on from here. Otherwise roll the each puff pastry into a square about 12" x 12".

Cut each rolled puff pastry a set of 4 squares.

Spoon 1 - 2 tablespoons of the mushroom mixture into the centre of each square and fold diagonally so that it forms a triangle shape. Be sure to pinch the edges down so that none of the filling comes out.

Bake for 30 - 35 mins or until golden brown. Posted by Hello

Saturday, May 28, 2005

A fancy snack to impress your friends

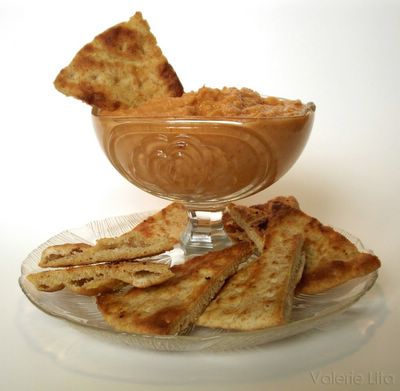
At one point or another in your life you'll be bound to have guests over and you'll want to impress them with a show of your savvy cooking skills. Well this is the perfect snack for hungry guests to show them that you can be both health conscious as well as culturally diverse.


Roasted Tomato Hummus & Pita Chips
Adapted from Cook's Companion and other various courses

Garlic Pita Chips
1 package pita bread
1/2 cup olive oil
2 garlic cloves, crushed

Take each pita bread and slice it into eights so they look like mini pizza slices.

In a separate bowl combine olive oil and garlic cloves, let sit for 10 to 15 minutes and preheat oven to 375F.

Place pita bread slices onto baking sheet covered with parchment paper. Drizzle garlic oil with crushed garlic over pita bread and bake for 15 - 20 minutes until slightly browned and crispy.

Roasted Tomato Hummus
5 plum tomatoes, halved lengthwise
sea salt, optional
pepper, optional
540mL can chick peas (garbanzo beans)
3 -4 tbsp lemon juice
4 garlic cloves, crushed
olive oil

Preheat oven to 400F. (I usually just leave the oven on and turn it up after baking the chips)

Place tomato halves cut side up onto baking sheet and season with sea salt and pepper then drizzle with olive oil. Bake at 400F for 15 - 20 mins until tomatoes show signs of browning and become wilted.

Remove slices from oven and set to cool.

In a food processor combine chick peas a few tablespoons olive oil, lemon juice and crushed garlic, blend until smooth. Add the roasted tomatoes and continue processing until you reach your desired consistency. If you want a smoother hummus you can add a little more olive oil and continue processing.

Serve with garlic pita chips. Posted by Hello

Tuesday, May 24, 2005

Easy Peasy Cheesies

I love cheese, I have always loved cheese and I'm pretty sure I will always love cheese. Something about the savoury flavour that you just can't get anywhere else.

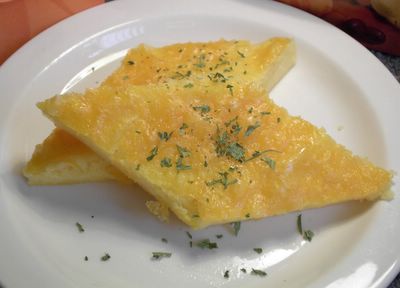
I stumbled upon this little gem of a recipe that is simple and fairly quick to make. Which is tops on my boyfriend's list since he's not as into cooking as I am. It's called Cheesy Vegetarian Slice, and I found the original idea in a recipe book that I was pouring over one day.


Cheesy Vegetarian Slice
Adapted from Cook's Companion

3 cups water
1/2 cup + 2 tbsp cornmeal or polenta
1 egg
3/4 cups Cheddar cheese, grated
1 tbsp butter or margarine

Preheat oven to 350F and grease a 9x13 in. baking dish.

Put water into a saucepan and bring to a boil. Whisk in cornmeal until thickened.

In a small bowl, beat the egg lightly. Add a large spoonful of the cooked cornmeal and stir well to mix. This is very important! If you add the egg directly to the hot cornmeal mixture you'll end up with scrambled eggs instead of a binding agent. Next add two-thirds of the cheese, all of the butter and stir until the cheese melts.

Transfer the mixture into the baking dish sprinkling the remaining cheese on top then bake for 35 - 40 minutes. Let cool for 5 minutes before cutting and serving.

Makes for a tasty side dish or snack. Posted by Hello

Saturday, May 14, 2005

Lemon goodness


Nothing is more satisfying than eating a big stack of pancakes on a Saturday morning. And in the case of these pancakes, I've added a bit of a twist, making them Lemon Soufflé pancakes. Light, fluffy, lemony like puffy mouthfuls of sunshine in your mouth. Posted by Hello

Lemon Souffle Pancakes
Adapted from Better Homes & Gardens

1 cup all-purpose flour
2 tsp baking powder
3 - 4 tsp lemon zest, finely shredded
1/4 tsp salt
1 egg yolk
1/4 cup butter, melted
3/4 cup milk
3 egg whites
1 tsp cream of tartar

n a medium mixing bowl stir together flour, baking powder, lemon peel, and salt. Make a well in the center of flour mixture; set aside. In a small mixing bowl beat egg yolk slightly. Stir in melted butter and milk. Add egg yolk mixture all at once to the flour mixture. Stir just until moistened (batter should be lumpy).

In another medium mixing bowl, beat egg whites with an electric mixer at medium speed until soft peaks form, then add the cream of tartar and beat until stiff peaks form. Gently fold egg whites into flour mixture, leaving a few fluffs of egg white. Do not over-mix.

For standard-size pancakes, pour 1/4 cup batter onto hot, lightly greased griddle or heavy skillet. Cook over medium heat 2 minutes per side or until pancakes are golden brown. Turn to second side when pancakes have bubbly surfaces and edges are slightly dry. Repeat with remaining batter.